Stumpwork Embroidery | Anime Embroidery: Demon Slayer Vol. 13
3-D Stumpwork Embroidery
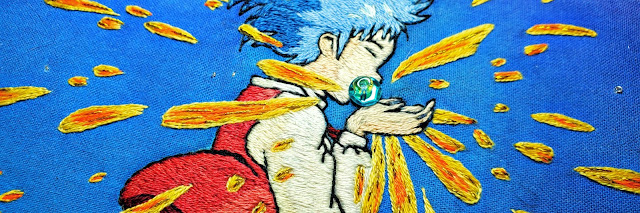
Demon Slayer Manga Volume 13
2 Layered Embroidery Stumpwork Hoop
Demon Slayer Manga Volume 13
Official Art Cover by: Koyoharu Gotouge

Hello everyone!
Senpai Stitching, hitting you all with a new blog about the most recent and coolest collaboration I've ever been in this year! I started this project around August and just finished it about a week ago.
When I read and watched Demon Slayer I immediately became a huge simp for everyone! Yes, even some of the demons.
I hope this stumpwork blog is helpful, this tutorial doesn't focus much on embroidery stitches and mainly focusing on the wire placement and the threaded fabric cut outs.
Before going into this tutorial I would like to mention that this is my first time embroidering with using wire, this is also my very first layered embroidery.
Well then, let's begin!
Happy Stitching!
Embroidery Patterns


With absolute honor giving you all the basic outline I created for the image, along with the shading guidelines. I know not all of us have the time to create the outline and most of us would just like to trace and stitch, so I hope my outlines are good enough for you to use in your future projects!


When creating my first hoop for the (bottom layer) background, I really wanted the entire background image completed and filled into the embroidery hoop.
I traced the image on the app Sketchbook to get a rough sketch of the background design, I then moved onto Picsart to edit in the long lines so everything can come out straight.

For this project I'm going to be embroidering and watercoloring in a 9.5 inch hoop, using a white cotton fabric. I also double layered my fabric to hide my black thread from showing through my hoop.
Window Method Tracing


I decided to go with the window tracing method to shorten time on hang drying if I used fabric solvy and I really wanted to avoid using carbon paper since it can sometimes smudge onto the fabric when tracing. If you'd like to try other ways of tracing your pattern for embroidering then you can check this blog to see which method you're most comfortable with.
Watercoloring

I apologize if this segment is a little short, again, I'm not that great when working with watercolors and try my best when putting effort into using them. Over the years I used watercolors this is what I've learned and noticed when utilizing them into my embroideries:
- Michael's has top notch watercolor brands!
- Walmart watercolor is great too, but I have to dilute my paint with less water.
- More paint than water makes it more pigmented and bold.
- Wetting the fabric before watercoloring helps blend the colors together, but also dilutes the color to fade giving it a softer look.
- Using a blow dryer on a cold setting makes the paint bleed and spread less.
- Let the paint dry fully when trying to watercolor multiple areas, working in sessions helps.

I'm using a watercolor brand called "Royal Langnickel"
Colors are: Cerulean Blue and Violet
I lightly sprayed water onto my fabric before painting it, that way my paints blend easily to create this two-toned/ombre look. I also used my blow dryer on a cool setting to dry my paint faster to make working in sessions with watercolor much more quickly.

and voila!~
Embroidering the Designs

When embroidering the straight lines onto the fabric, I was sure to begin with the filling in the designs with one strand of DMC 310 floss first! before creating any of the lines.
I learned from creating and embroidering the background for Tokito Muichiro, that stitching the lines at the very last moment was the best way for them not to move or shrink out of place. So, it was best for me to thread fill first before stitching my lines just to keep them straight.
After filling in the designs I moved onto creating the straight lines for the background, I used very long stitches and couched each stitched line individually, it did take a lot of thread but I needed my lines to be straight as possible.


This time around I'm super happy with the results of thread fill first and long stitch after.
Adding Felt


Taking this short cut saved my fingers life from stitching so much black thread, adding black felt onto my hoop helped me complete the hexagon shape and I was able to avoid having to fill those empty spaces with thread.
I also didn't want to watercolor or paint it black since I wanted my background hoop to have dimension.

And that is all for the background hoop I created!
If you have any questions on this portion of the tutorial please don't be shy to ask me! ☺
Moving onto the Stumpwork

Printing the Image

Now moving onto the category you've all been waiting for!
I hope I can explain this process correctly!


Quickly naming the stitches I used for the entire project.
Couching stitches
Long and short stitches
Satin stitching
Carbon Paper Tracing

For this project I decided to work with carbon paper.

♥


When tracing with carbon paper I usually use a lead pencil to get those thin lines making it easier to embroider over with no carbon appearance showing through my stitches.


When tracing with carbon paper I used painters tape to hold it onto my fabric and that usually works very well, if it moves excessively I'll use my paper weights to control the movement but it's best not to apply too much pressure on the carbon paper to avoid that smudging.
In this case I really didn't have to focus too much on smudging since I'm going to be cutting out Genya anyways, so I went painters tape and my paper weights to get each and every detail with no concern about the blots carbon paper leaves.
Wiring Materials

The thickness of the wire I used for Genya was about the width of a paperclip, it was also very sturdy, which is very important to me since I wanted Genya to be standing centered in my hoop.
This wire was also super easy to manipulate with my fingers, the embroidery needles and pliers!

The only time I used the pliers was to sharpen some of my corners and to cut the wire when I finished.
Couching the Wire


sorry for the bad lighting, I legit worked on this day and night!
When couching down the wire into the outline of what I traced, I was sure not to cut off any wire since I didn't structure the reference image first. My image was pretty large and that made me nervous to shape it first then stitch it into place.
Also my main priority was not losing the body form as I stitched, since I found myself pulling as I worked and embroidered my couching stitches.

In my opinion, I would recommend to begin the couching stitches at the start of the cut wire with the roll at the opposite side to lengthen and extend the wire when stitching. This helps with finding the precise measurement and helps to avoid waste.
You might be thinking the roll will be in the way and the long piece of the wire is bothersome, to be honest I had no problem doing it this way.

This part was pretty stressful, it took a lot of maneuvering into corners and creating curves but easy since all I did was couch everything in place.
Twist and done!...for now.


Be sure when twisting close your wires as doing it too much you could bend the wire to break off.
Satin Stitching

Luckily for this part I took out my old needles and began using those, in the beginning when creating my satin stitches with a brand new needle it began to bend horribly within the hour.
I might have underestimated the thickness of the wire when stitching in the satin stitches or perhaps I was stitching closely into the wire but that of course is the point.


This part was fairly easy, my fingers did suffer a brutal slaughter by the puncture wounds of the backside of my needle, but how else am I supposed to explain how this piece was created by blood, sweat and tears?

Thread Fill

Since I wanted the arms to be bendable and move nicely, I made sure to do short stitches as opposed to doing both long and short stitches. I didn't want my stitches to loosen up when being able to move and bend the arm, so doing small stitches helped give it that embroidering machine look.


Now that I finished filling in everything with black thread and outlined all the small details with sewing thread I can finally move onto picking out my thread colors.
DMC Color Palette


Gun Handle
- 433
- 758
- 779
- 3031
Gun
- 159
- 160
- 168
After I finished filling in the color, I can now move onto making it more sturdy and carefully cutting it out before removing the fabric out of the hoop.

Adding Interfacing

Before removing the fabric out of the embroidery hoop, I was sure to iron on the interfacing first, I have a mini iron and doing that was pretty easy. Again, I am using a light weight interfacing and I doubled the layer because I remembered ✨ structure ✨


Adding interfacing was just an extra step to help me ensure that Genya will be standing without putting too much weight into my stitches. I could've used heavy duty interfacing but then would defeat the purpose of being able to bend the arm without it forming back into shape.
Cut, cut, cut! Carefully ☺


When cutting out the pieces, I was sure to get as close as possible to the wire, being safe not to snip my satin stitches because that would be the biggest disaster if everything starts to fray loosely and come undone.

Now giving you small unedited photos of how this came out ☺
Close ups!


The Final Step


Hair
- 470
- 471
- 726
- 310
- B5200
- 159
Skin
- 950
- 3856
- 3770
Handle
- 351
- 3045
- 310
Vest/Collar
- 209
- 3837
- B5200
- 762
- 168
Eyes
- 3837
- B5200
- 168
- 310
Steel
- 159
- 160
- B5200

When embroidering I use long and short stitches when filling.
Going back to do the same ironing process I did for the arms, I kind of tripled the layer of interfacing only because Genya is pretty big at this point. My measuring was way off and I'm just happy he fit nicely in the 9.5 inch hoop he's going in.
Genya still was a little heavy so I had to use an (filament) invisible thread to hold him up in place.
Also if you need or would like further visual assistance, I uploaded a Youtube video tutorial gently explaining the wiring and couching stitches process!
Click the title down below.
Thank you all so much for taking the time to read through my journey making this stumpwork embroidery, it was a thrill and a big step for me into embroidering. This is my first attempt to do something with so much depth and design, I'm happy I was able to pull it off the way I envisioned it!
Again, if you have any questions about the process of this embroidery I'd be more than honored to help you!
Thank you!

Comments
Post a Comment